Decoding TLS with PHP.
 ·
·
As a proof of concept I wanted to see in how far I could decode some TLS data on the client side. Obviously, this is very complex matter, and even though TLS looks deceptively simple, it isn’t. To make matters worse, PHP isn’t quite helping us making things easy neither.
Capturing TLS data
It’s not easy to decrypt TLS data if you’re not affiliated with 3-letter organizations. After all: that’s the whole purpose of using TLS: encrypt en authenticate data. But since we want to decode data from the client endpoint, this makes things a little bit easier for us. I’m using a more complex setup to get our data, but this is mostly because the setup was already in place for some other purposes. You can just tag along hopefully, as it isn’t really hard to try it yourself.
First of all, you’ll need a browser (Chrome or Firefox are fine, Safari and IE aren’t!), and a website to connect to. In
this case I’m using github.com. Before we start our browser, we have to do a neat trick that allows us to see some
internal TLS information from the browser. You’ll need to set an environment variable called SSLKEYLOGFILE to a
certain file where it will store all kind of data. Under OSX, this is done by entering the following in your console:
launchctl setenv SSLKEYLOGFILE /tmp/sslkeylogfile.txt
This will actually log some information about SSL keys and secrets in the file so we can use it later. Next, we will use
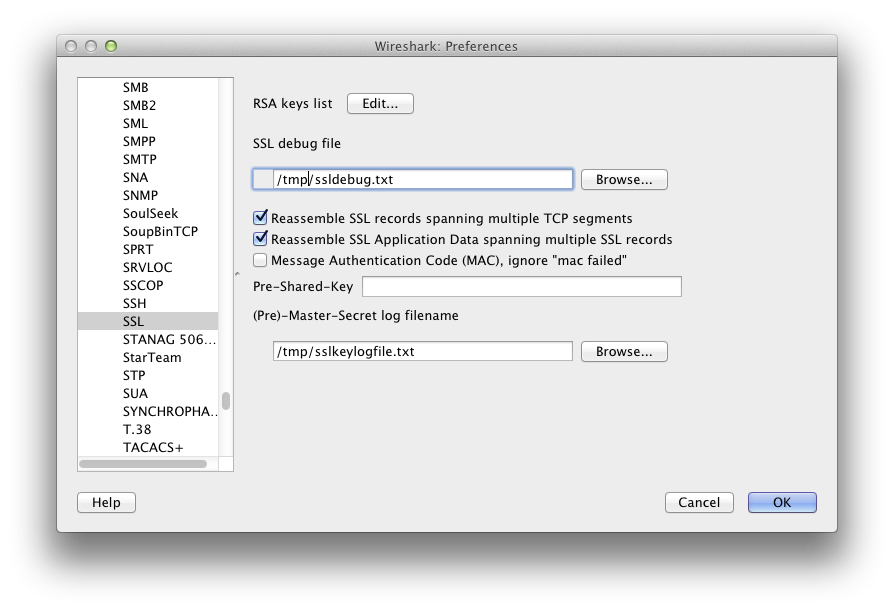
wireshark to do some serious TLS debugging. Before we actually start with that, we need to set some preferences. In
wireshark, go to your preferences, and select SSL from the protocol list. Here we will set the ssl debug file. That will store some additional SSL debug information (we don’t really need it, but makes it much easier to
figure out what’s going on, but be careful, this file will become VERY large in a short time!). Most important setting
is the (pre)-master-secret file. You will need to set this to the path you filled in your SSLKEYLOGFILE. This
allows wireshark to actually use your browser data to automatically decrypt TLS data (so you can automatically look into
your encrypted TLS data and see the HTTP or whatever you have running beneath).
From this point on, you can start a new wireshark capture on your outbound interface. Next you go to your web-browser and go to https://github.com/favicon.ico (i use this so your browser only does one fetch, when fetching the index, your browser will automatically issue many connections, and we want to isolate just one, this is probably the easiest way).
In wireshark you will see a lot of data, but you can easy filter this by adding SSL in the filter-bar. This will
filter out everything that is not SSL. If you see too much, you might have other applications open that uses SSL, like
twitter etc.. I turn all my applications of so they don’t interfere, but you might even filter wireshark to filter only
for the github.com ip address. In the end, i’ve got something like this:
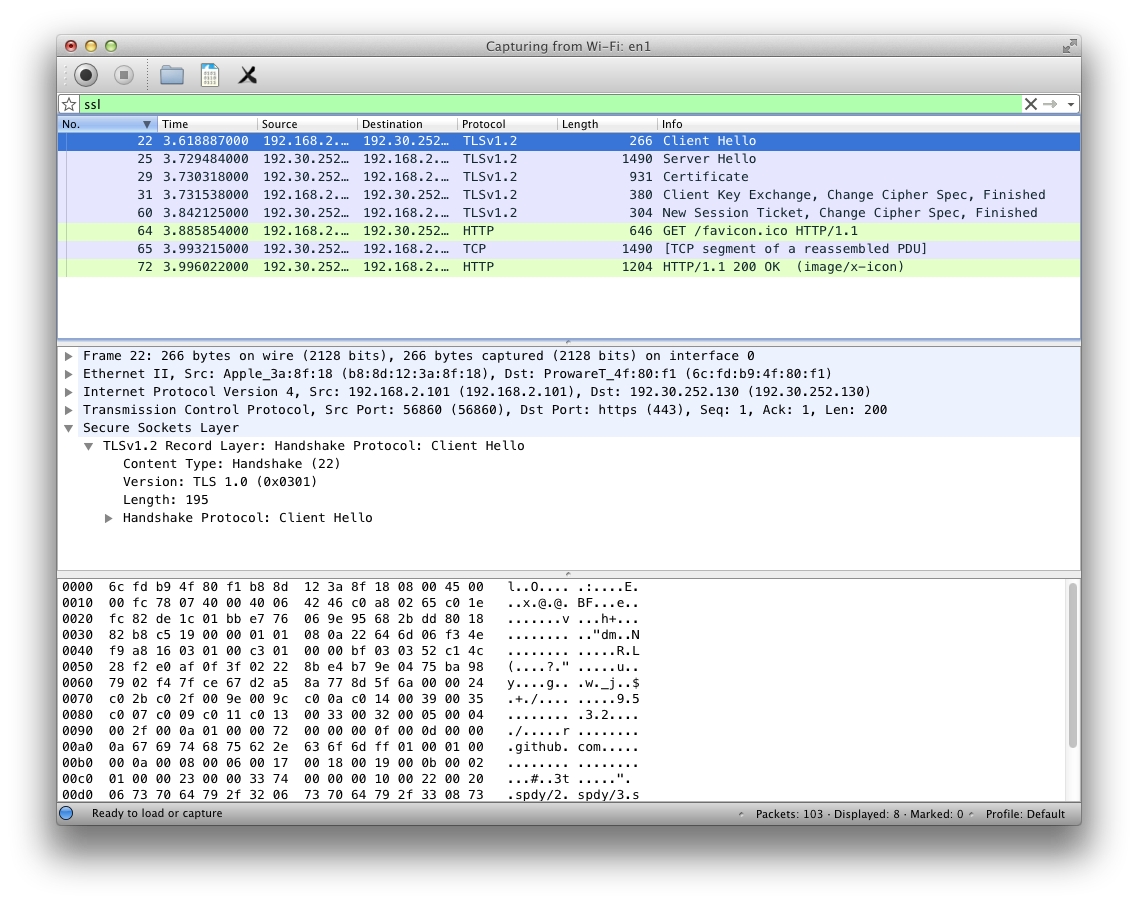
You see that it automatically decrypts the HTTP records that encrypted by TLS (this is because of the SSLKEYLOGFILE). Obviously our goal is to achieve the same thing in PHP. But you need some of the data from wireshark to get to that point.
Gathering all the necessary fields
Because this is a proof of concept, i’m not doing the actual connection of TLS. I will be using some pre-captured data
which I will be decrypting. There are 3 important items we need: 2 of them are available directly from the line, but one
isn’t. The two we need are called the client_random and the server_random. These are 2 random values generated
by respectively the client and the server and send over the line unencrypted. We use this as input for generating some
keys we need later.
The 3rd value is something called a pre-master-secret. This is some data that should be kept VERY safe and is send
over encrypted from the client to the server (in the so-called client-key-exchange record). The way this is encrypted
depends on the so-called cipher-suite that is used. Normally, the client send over a list of different cipher-suites
that it supports. The server checks this list, and chooses a cipher-suite and sends this back to the client. So it’s the
server that ultimately decides which cipher-suite they will be using for communication. This is important for us, as
encryption,decryption, authentication and integrity depends on the selected ciphersuite. Some of these suites are
strong, others are weak, and some of them are even broken and should not be used.
Funny enough, github.com doesn’t use the strongest cipher-suite that most browsers are sending. This has a few reasons:
using strong cipher suites result in more complex encryption/decryption, and thus more computer power that must be used.
Also, some “stronger” suites are vulnerable to certain current attacks, while some weaker suites aren’t. So it’s a kind
of a trade-off. For now, it’s safe to say that github.com uses the TLS_RSA_WITH_RC4_128_SHA suite and it’s ok for now,
although this might likely change in the (near) future.
Inside wireshark, we can actually see the list of cipher suites we are sending in the client-hello record (strongest
and preferred suites are at the top). The one that we will be using can be found in the server-hello record. This is
also where our client_random and server_random can be found.
Inside the client-key-exchange record, we can find our pre-master-secret. Since the ciphersuite we use is TLS_RSA_*,
it means that we are using RSA to encrypt the pre-master-secret (no-one but the server at github.com can decrypt this
data!).
But for our purposes, we need to have this pre-master-secret as well. Here is where our debug files come into action.
Inside the SSLKEYLOGFILE, it will actually store these pre-master secrets. Inside this file, there are lines starting
with RSA. The next number the first part of the encrypted key (not ALL of it!), and the next long number is the actual
pre-master secret. All we need to do is find the encrypted part, and fetch the matching pre-master secret.

In my case, my encrypted key starts with 04294e1aab81, and in my SSLKEYLOGFILE, this matches up with the actual
pre-master-secret of 03034f855727c944e11c5d74490ce62b550db46a96b32a7be76d68342dcc7fe9c87026090ebb99245f3ffd13f9ed185a.
Ok, so it’s not so secret anymore.. :(
Now, we have our 3 main components: client_random, server_random and pre-master-secret. Let’s get decoding!
Decoding TLS_RSA_WITH_RC4_128_SHA
We already know that we are using the cipher suite TLS_RSA_WITH_RC4_128_SHA. This means that the pre-master-key is sent
over via RSA. But it also means that the actual data encryption is done through RC4 (which is a commercial version, the
“free” version is called ARCFOUR, which gives the EXACT same results). The 128 means that we are using a secret key that
is 128 bits (16 byte) long, and the SHA part means we are using SHA1 for checking integrity of our data.
From pre-master-secret to master-secret
First we need to convert our pre-master secret to a master-secret. If you look closer inside your
SSLKEYLOGFILE, you will see lines starting with CLIENT_RANDOM. These lines contain a client-random value and a
master-secret. So it’s pretty easy to find the correct master-secret. However, we will do it manually which is possible
with the data we’ve already gathered.
The most important part of generating such a master-secret is the PRF (pseudo-random-function). This PRF has changed
over the different versions of TLS, and TLS 1.0 and TLS1.1 are using a very complex PRF. Luckily, the TLS1.2 version
uses a most simplistic one. Since the chrome browser talks TLS1.2 (and fortunately, github too), we can use this PRF:
{% highlight php startinline=True %}{% raw %} // Pre master secret $pre_master_secret = hex2bin(“03034f855727c944e11c5d74490ce62b550db46a96b32a7be76d68342dcc7fe9c87026090ebb99245f3ffd13f9ed185a”);
// Client and server random values $client_random = hex2bin(“52c14c28f2e0af0f3f02228be4b79e0475ba987902f47fce67d2a58a778d5f6a”); $server_random = hex2bin(“52c14c298bf57e252efc0835a685b875bb9670e7ab2293e03b78381e046de736”);
// Calculate master secret $master_secret = prf_tls12($pre_master_secret, ‘master secret’, $client_random . $server_random, 48); {% endraw %}{% endhighlight %}
As you can see, the master secret is created by the pre master secret (in binary form), a literal string 'master secret',
and the concatenation of the client_random and server_random. The 48 means the master_secret must be 48 bytes long.
The prf_tls12 function is pretty easy too:
{% highlight php startinline=True %}{% raw %} function prf_tls12($secret, $label, $seed, $size = 48) { return p_hash(“sha256”, $secret, $label . $seed, $size); }{% endraw %}{% endhighlight %}
It just uses the p_hash function, where it will be using sha256 to create our key. No matter which cipher we use for our communication, the generation of the master-secret in TLS1.2 is always using sha256.
Next up, the p_hash function:
{% highlight php startinline=True %}{% raw %} function p_hash($algo, $secret, $seed, $size) { $output = “”; $a = $seed;
while (strlen($output) < $size) {
    $a = hash_hmac($algo, $a, $secret, true);
    $output .= hash_hmac($algo, $a . $seed, $secret, true);
}

return substr($output, 0, $size);
}{% endraw %}{% endhighlight %}
Ok, this looks a bit complex, but basically what it does is generate some output based on the previous output. What it does is explained in http://tools.ietf.org/html/rfc5246#section-5, the actual RFC for TLS 1.2. But it boils down to this:
P_SHA256(secret, seed) = HMAC_SHA256(secret, A(1) + seed) +
                             HMAC_SHA256(secret, A(2) + seed) +
                             HMAC_SHA256(secret, A(3) + seed) + ...

   A() is defined as:
      A(0) = seed
      A(i) = HMAC_SHA256(secret, A(i-1))
Depending on how much data we need, we have to run this multiple times. Since sha256 returns a hash of 32 bytes (256 bits), and we need 48 bytes for our master-secret, it means that we must run this p_hash function twice so we have 64 bytes. Then we will return 48 bytes and just ignore the last 16 bytes. Every time we add more data, we use the output of the previous round as the input of this round.
After this, we have our actual master-secret. You can verify if this is correct, by checking against the master-secret
you can find in the SSLKEYLOGFILE.
Partitioning our master-secret
But a master secret isn’t a key yet. For this, we must repeat the same trick again, but with different data and values:
{% highlight php startinline=True %}{% raw %} $key_buffer = prf_tls12($master_secret, ‘key expansion’, $server_random . $client_random, 72); {% endraw %}{% endhighlight %}
It looks pretty much the same as we did while generating the master-secret, except we use the actual master-secret
(pre-master secret is not used anymore and must be officially discarded and cleared from memory). The label we use is
'key expansion', and something that is easily overlooked: the server-random and client-random are reversed in this
phase.
You notice that we use 72 here as the size, and this value depends on the given cipher suite. The data that comes from
this $key_buffer is used for 6 different variables: a client_mac, a server_mac, a client_key, a server_key, a
client_iv, and a server_iv. Since we use TLS_RSA_WITH_RC4_128_SHA, it means that the macs are 20 bytes, the keys
are 16 bytes and the IV’s are 0 bytes, taking us to 72 bytes in total.
Next we “partition” the key_buffer into our variables:
{% highlight php startinline=True %}{% raw %} $client_write_mac = substr($key_buffer, 0, 20); $server_write_mac = substr($key_buffer, 20, 20);
$client_write_key = substr($key_buffer, 40, 16); $server_write_key = substr($key_buffer, 56, 16);
$client_write_iv = “”; $server_write_iv = “”;{% endraw %}{% endhighlight %}
The reason that the IV’s are empty is because RC4 is a stream cipher and does not use IVs. Notice that we have both have client and server keys, macs and ivs. This is because communication from a client to server uses a different values as communication from a server to client. IF somebody cracks your client_key, it can only decode message from the server to the client, but not the communication from the client to the server.
Decoding our data
Finally, we can decode our data!
But, there is a big problem when dealing with RC4 in PHP. This cipher is available through the mcrypt extension. The downside of this library is that it does not function the way TLS assumes. When initializing this cipher with our key, it sets the cipher in a certain state. When decoding data, this state changes. TLS assumes that the next data it encrypts/decrypts is done with this new state. However, PHP’s mcrypt does not and always “resets” the state. This makes it that you can decrypt (or encrypt) the first TLS packet without problems, but you can’t decrypt or encrypt the next packets.
For this reason, i’ve decided not to use the standard RC4 implementation through mcrypt, but I will be using a custom RC4 class that i’ve written and it’s loosely based on a RC4 implementation found in the php documentation. Fortunately RC4 is pretty simple in how it works, and this class saves the state so it can be used for TLS purposes.
{% highlight php startinline=True %}{% raw %} // Small implementation of RC4, slightly based on http://www.php.net/manual/en/ref.mcrypt.php#87274 class RC4 { protected $i = 0; protected $j = 0; protected $S = array(); protected $key;
function __construct($key) {
    $this->key = $key;

    $this->S = range(0, 255);
    $j = 0;
    $n = strlen($key);
    for ($i=0; $i!=256; $i++) {
        $char = ord($key{$i % $n});
        $j = ($j + $this->S[$i] + $char) % 256;
        $this->swap($this->S[$i], $this->S[$j]);
    }
}

function encrypt($data) {
    return $this->_crypt($data);
}

function decrypt($data) {
    return $this->_crypt($data);
}

// Don't swap through XOR
protected function swap(&$v1, &$v2) {
    $tmp = $v1;
    $v1 = $v2;
    $v2 = $tmp;
}

protected function _crypt($data) {
    $n = strlen($data);
    for ($m=0; $m<$n; $m++) {
        $this->i = ($this->i + 1) % 256;
        $this->j = ($this->j + $this->S[$this->i]) % 256;

        $this->swap($this->S[$this->i], $this->S[$this->j]);

        $char = ord($data[$m]);
        $char = $this->S[($this->S[$this->i] + $this->S[$this->j]) % 256] ^ $char;
        $data[$m] = chr($char);
    }
    return $data;
}
}{% endraw %}{% endhighlight %}
To use it we just construct it with the secret key, and use the decrypt/encrypt methods (decrypt and encrypt does the
same thing. Encrypting something twice returns the original text, like rot13 and such).
Armed with our new class, we can do some decoding. The bytes below are just encrypted packets from the TLS connection.
{% highlight php startinline=True %}{% raw %} // Create our client and server ciphers $client_cipher = new RC4($client_write_key); $server_cipher = new RC4($server_write_key);
// “finished” packet from the client $bytes = hex2bin(“9e8e681ce6407984d7f0966d770e06180c81682fb2c553288f655b2c242bbc6dbf208ec9”); $plaintext = $client_cipher->decrypt($bytes); $mac = substr($plaintext, -20, 20); $msg = substr($plaintext, 0, -20); print bin2hex($msg) . “\n”;
// “finished” packet from the server $bytes = hex2bin(“8ed128fc47354243242d621242b06a42eb964e14f354da70bd54b12191b26bd76b993b64”); $plaintext = $server_cipher->decrypt($bytes); $mac = substr($plaintext, -20, 20); $msg = substr($plaintext, 0, -20); print bin2hex($msg) . “\n”;
// application data packet from the client. This is our first HTTP packet $bytes = hex2bin(“31dd7439f2922fca00419902b1689c4a2ddef9fa17ff01282cc09edf3872d8dec17f6b261a5ab108a268352f3907a09c8800828553bf8cb2bec0856bcd35dd51398410abb1d9ca6d23f0e61499e6520f30744a5a40919a3ef4f7461abe7a535e5bb0c378ec7530963e0b40c142dcf18519e9a09af341163037ed6a6cae0a6763cd626fb7589594865bd0cb8e6998cc66cc1e6add90c8dbd0d7eae5d122a2ea7190b65872ed3adadee41ab442f70cba2e01f66ebb315b7c763d3596a888ae70a5997a4157d296e6d07b717839c229e9fb6f9ac7adc8a86464b9892ac0541314003f22bc61b815d3d5cb525d4c002a387cdb22bed0f201b718601d5fdb12f6dabb2c40e86692d37cd12ad5241acde41beb189b321fe41f554cbe3613f4b51d23bc8ef64dc33f09f48a5b2b3e1add5c1467b9c52cbf7b2bdeee1c6ac3ee0487443aa989c7b2e17685c8524c7bfe9ff0d72edd5cb19da4db20d30e17ad9b13759f25ed1d4a285acee3d769c1ba15302d906143820915496bacfd940cae9d295383b4645bc1c6967885ec0a6fc0c8423e70e8bbbe8038e375b0737daac620b883ae07e67535b27bd8b8b6e342880b268b5d61dd1131d6167bbae14fc581708b52df224f7f17d7f69fd987f25e1f59470bee35cc6487783103313668db15480483e57412d113fa91d19d7d0730c7e3771da7d9fe940fc8e34f66729f0ae806bb30d8631b9699576f86172921ac57adc7634e9507ebc2c88c742ee645e79c411267793f425b4d6c2da5e9f3bd7ed58dcb0371280bac6765cbb645a107b02d9584f224”); $plaintext = $client_cipher->decrypt($bytes); $mac = substr($plaintext, -20, 20); $msg = substr($plaintext, 0, -20); print_r($msg); print “\n”;{% endraw %}{% endhighlight %}
This should output some hex numbers, but also a GET/favicon.ico HTTP/1.1 request. As you can see, the second packet is
something the server has sent to us, and thus we must use our server_cipher instance to decrypt it. Notice that I strip
away some data at the end of our message (20 bytes). This is our MAC which we can use to verify our message. It’s 20
bytes because our used cipher_suite uses a 20 byte mac (SHA)
Also make sure that when you decode TLS data, you use the order in which the packets are arriving. You CANNOT decode the first HTTP packet without decoding the finished packet first (the thing about RC4 saves its internal state between encrypting/decrypting).
Verifying message integrity
TLS also allows us to verify the integrity of a send message. This is the part of the message we strip away (the 20 bytes). This number depends on the MAC function the cipher is using (SHA(1) in our case, which is 20 bytes). Verifying our message is not hard, but has some issues in PHP.
What we need to check if the mac that is received matches the result of the following:
{% highlight php startinline=True %}{% raw %} hash_hmac(“sha1”, <64bit sequence number><8 bit content-type><16 bit TLS version><16 bit message length><… bytes message>, $key); {% endraw %}{% endhighlight %}
$key is the client_write_mac or server_write_mac, depending on which message we want to verify. Sequence number
is a number that increments every time we decode a packet. The 8 bit content type tells us what kind of TLS packet we
are (normally, this is 23, which means it’s a application data packet, which holds our encrypted HTTP data. The TLS
version for TLS1.2 must be 0x0303, and the message length is just the regular strlen() of the message.
{% highlight php startinline=True %}{% raw %} function check_mac($seq, $type, $msg, $mac, $key) { $data = pack(“NN”, 0, $seq) . pack(“Cnn”, $type, 0x0303, strlen($msg)) . $msg; $calculated_mac = hash_hmac(“sha1”, $data, $key, true);
return ($mac == $calculated_mac);
} {% endraw %}{% endhighlight %}
This check_mac is very fixed on TLS1.2 and SHA1. But as a proof-of-concept it works. One problem that PHP has is that it cannot not pack 64 bit numbers. For now we fix this by using 32bit numbers and hopefully we will not run out of numbers. For a decent implementation, you probably need some bit-shifting and bit-masking to store the sequence number as binary data.
Source
This should be enough to get you going and to decode some TLS data. I’ve placed everything a bit neater together into a git repository. Check out the code at: https://github.com/jaytaph/TLS-decoder